The Learning Curve.
David Miller discovered the world of Jampots, and found the time to write down his experiences
as he went along.
I don’t know what made me do it, really. I had been a member of the VMCC for several years with
my Honda CB250RS, but somehow it didn’t really fit in with my idea of what an old bike should be
like. And it wasn’t British. So, with half an eye, I was looking out for a bike looking less like a plastic
Hong Kong Christmas toy and more like a gridiron. Black, with gold transfers on it. The gearchange
had to be on the other side. And an oil leak. Yes, something definitely British.
No one in our local branch of the VMCC seemed to be on the point of getting rid of anything I might
want. Indeed, much of the talk was about what they had just acquired, usually from the back of
someone’s remote barn, although what most of them were in fact contemplating was changing over
from kickstarts to electric legs. We are nearly all getting to that age, aren’t we? And I am one of the
oldest in the group, so that I knew it was now or never when it comes to getting an old bike.
My pension is paid in one lump sum for the whole year, so that in May, June and July, I am feeling
fairly flush, but after that I get increasingly skint, until the following April feels like the longest month
in the whole calendar. So again, by July, it was now or never.
Cheffins vintage sale at Sutton, near Ely, is in July.
I didn’t know that I was looking for an AJS until I saw it at the sale preview. Sometimes, just very
occasionally, you can just look at something and know that it will be just what you want. I
remember once that it applied to a bed and breakfast place, and I looked miles across a valley to a
little house in some remote spot, and said to my Wife “that’s where we will stop.” When we got
there, it was a B & B, it had room for us, and it was great. I suppose, looking back, that I had always
had a regard for the Matchless and AJS marque. Back in the 1950’s, I had gone to every scramble in
the Chalk Pits near Cambridge, and had lapped up the energy, the dust, the excitement and the
smell of Castrol R as Brian Stonebridge and Joe Halsey chased each other round the course on their
350’s. Who remembers the Cambridge Centaurs? My memories were to bear fruit sixty years later.
Cheffins only have viewing on the day before the sale, which gives little time to ask around one’s
contacts for what you should look out for. Fortunately, a number of our local VMCC were there just
for the entertainment, which I was able unwillingly to augment for them. The bike looked nice and
clean, ready (as the Agents said) for the road. It had had a restoration, and the external tinware and
paintwork was good. The tyres were good. Some money must have been spent upon it, but it had
been off the road since 1994. The old MOT documents said that the recorded mileage was 25000.
Well, not impossible, but somewhat unlikely.
Time to try the compression. I stood on the offside of the bike, held it upright, and tried the
kickstarter. The compression was very good indeed. No problems there. I leant the bike over back
on to its side stand, only to discover that the self retracting sidestand had self retracted itself. There
is absolutely nothing you can do if you lean a bike too far over to the left, when you are standing on
its right hand side. Bike and I gently fell over, me hanging on to it for dear life to stop it going over
too quickly, fearing that it would knock the next bike in the row over, and start a domino effect. I
was rescued by the sale staff, but to drop a bike in a sale room, and especially with your friends
around watching . . . . At least they were amused, although I wasn’t.
The club gurus at the viewing passed a few adverse comments, which found their way back to me. It
wasn’t a 1957 model as advertised, it was a 1953 with a 1957 motor, it should have two pilot lights,
Page 2 of 6
the back mudguard was wrong for the model, and so on. I was very pleased. If that was the worst
they could find against it, then for a bike to ride, as opposed to a collector’s item, it was going to be
all right. I left a bid, since there seemed to be no point in going to the auction the next day, only to
watch it being sold at a higher price than I wanted to pay. On the other hand, if the bidding did not
go as high as the figure I had left with the auctioneer, then I would get it at the lower price.
And so it turned out. I had left a bid of £2555, but I got it at £2200. Add on the auctioneers’ fees,
and VAT, and it came to just over £2400. So that was the going price (as at July 2012), and the
general opinion was that I didn’t pay too much for it, unless, of course, there was something really
wrong with it. And that’s where the Learning Curve begins.
My friend Mike Hobbs offered to collect the bike with his trailer, and we went along a couple of days
after the sale to pick it up. There it was, standing proudly astride a huge puddle of oil. I began to
wonder what I had just paid for, but it was too soon (or too late?) to worry about that, and we rolled
it onto the trailer and set off for home. Twenty miles down the road, and Mike was driving slower
and slower. I thought he was about to stop, but he carried on, very slowly and carefully, until we got
home. He had seen the bike had been leaning over further and further on the trailer against its
rachet straps, until it looked ready to fall over totally. I am sure one good jolt would have done for it
altogether. That was Learning Curve stage 1 – make sure that it is properly secured on the trailer. I
was very lucky to have got away with it.
It was the next day that I advanced, toolbox in hand, down to the stable to find out in more detail
what I had bought. We have probably all experienced that half hopeful, half fearful moment when
there is everything to do, and yet everything still to discover.
What I did discover was a further oil slick. I had been warned about leaks from the primary chain
case, but this was more than just a drip from a poorly fitting seal. I had visions of a cracked
crankcase, blown seals, missing bolts, or whatever. Where was it all coming from? There was still
plenty of oil in the tank. There was a clue in that the leak was only bad when the bike was on its side
stand and leaning over. Put it up on the centre stand, and the leak diminished to the point where it
was possible to try to find its source. This appeared to be from somewhere between the crankcase
itself and the inner primary chain case cover, so it was nothing to do with the neoprene seal
between the inner and the outer primary chain covers. Instead, could this perhaps be the wettest
sump of all time? After all, it had been standing for some eight years, so the oil had plenty of time to
get everywhere it shouldn’t.
Draining the crankcase produced more oil from it than there was remaining in the oil tank, and the
leak thereupon stopped. That was one small triumph, and it confirmed that I did not have to worry
about the primary chain case. Perhaps the oil had come out of a breather in the crankcase? A bit
more learning to be done, but there were other items I wanted to look at before the bike was put on
the road.
First, the tank had to come off so that I could get any loose rust out, and that meant that the seat
had to come off too. There was no problem with the seat, but the tank securing bolts were in poor
shape, and only one had any claim to still having a thread. Not only were the threads on the bolts
mangled, but the threads in the tank into which they screwed had gone completely. Tank bolts to
the correct pattern with chromed heads could be bought new, but the tank threads had to be
replaced too, and the only thread inserts I had were 5/16 BSF. The original thread used by AJS was a
5/16 thread with 26 tpi, whereas BSF threads are 22 tpi. Having been in old aircraft restoration for a
long time, I had a stock of 5/16 BSF bolts which would do the job, so I decided to use BSF cadmium
plated A25 bolts to hold on the tank. They hardly show, anyway. The 26 tpi cycle threads looked
Page 3 of 6
very light and flimsy, and since they had stripped, they had already been proved to be not up to the
job, so the chromed domed head bolts with their few remaining threads were discarded.
With the tank off, I poured a pint or so of petrol in, added a handful of nuts and bolts, and gave it a
good shake about to try to dislodge the rust and any other odd bodies which might have collected in
it over the years. Learning curve No.2: Before you do anything like that, take the petrol taps out, or
you will destroy the finger filters. But then, No.2a: If there is that much rust in the tank, then the
finger filters have probably disappeared into red dust as well, all of which will be filling up the taps
and the petrol pipes. So the taps have to come out anyway, and I found the sliding part of the taps to
be immoveable due to the long period of disuse. I dismantled the taps, drilled out the last vestiges of
the finger filters, and threw out the old, stiff, petrol pipes before they started to crack. You can’t
beat putting right problems before they actually occur.
The next problem: I found that I had in my lap four pieces of broken petrol tank badge rather than
the regulation two complete ones. Somehow, in shaking the tank about, I had managed to smash
both the plastic badges which had been rather loosely bolted onto the tank. So not only was my
prized purchase being reduced to parts, but I was also wrecking the parts in the process. One of the
plates which hold the knee rubbers had corroded badly along the bottom edge, and the rubbers
themselves were getting rather elderly, to say the least, so a long session on the PC was indicated,
trying to find the parts which I would have to have when it all started to go back together. E-Bay
produced some good results, and some things were cheaper than the regular parts suppliers.
Now what? Well, the tank had looked rather shabby when the bike was at the auction, because
there had been some patches of rust or damage which had been obtrusively repaired. They would
have annoyed me every time I sat on the bike, and I had decided before I left a bid that the tank
would have to be re-finished. At the same time, I would get a better idea of the condition of the
tank from the outside. Several hours (days?) later, after sessions with paint stripper, sanders and
wire wheels, I was able to take stock. There were several areas of Plastic Padding, quite well done,
but with a little rust showing, which made me wonder just how much rust had been allowed to
remain under the filler. The underside of the tank was quite seriously rusty, but it did not seem to
be on the point of failure. In all, it was what you might expect for something now over fifty five
years old. The filler was removed, mainly with a hammer and chisel, which at least confirmed that
the adhesion of the padding would not have been a problem, except that there was more rust under
the filler than I wanted to see. More wire-wheeling soon cleared that, but the underside of the tank
required a session in the grit blaster because of all the awkward corners which could not be reached.
The dents which the Plastic Padding had filled were not too bad, considering the age of the item, and
I was happy to re-fill the damage and get the tank back into shape. The inside was treated with
Kurust, which may or may not turn out to be a good idea. It turns everything black (especially
fingers) but it may be insufficient on its own to prevent the rust re-forming once there is petrol in
the tank. The rust was not bad enough to justify sloshing the inside, at any rate not for the present.
The matter of re-finishing the tank, and re-doing the gold lining, was put on hold for the moment.
Back to the dirty, greasy work. The primary chain had to be looked at, if only to check the oil level,
so I unscrewed the bolt holding the round inspection cover to have a look inside. The cover did not
want to budge, having been in place for so long, so I undid the centre screw completely and gently
tapped it off. The oil inside looked good, but I got out as much of it as I could, and replaced it with
fresh oil. The chain was all right, and the tension was right too. The cover could then go back on.
Ermm . . . how did it fix? I had expected to find a captive nut, or something of the kind, ready to
take the centre bolt. There was just an empty hole.
Page 4 of 6
It didn’t take long to see that I should not have unscrewed the bolt completely, as this held a bar
which bridges the inspection hole from the inside, and when released, the bar drops down into the
bottom of the primary chain case. A bit more learning curve! Fortunately, the bar was retrieved
with a magnet on the end of some stainless locking wire, otherwise it would have meant taking the
outer cover off and spoiling what I hoped was an oil-tight seal. I was beginning to get the feel of
1950’s British engineering again - hard to reach bolts, funny threads, and idiosyncratic fixings.
Would there be any more?
Answer - yes. The air filter is held on by a band, and the securing clip has to be undone completely
to get the filter off, but it then springs apart into two halves which scutter across the workshop floor
into the furthest corners as if fearful of human beings. I also managed to lose one of the filler plugs
from the battery, but came across it by chance a week later in the middle of quite a large lawn when
I wasn’t looking for it. I had rather thought that it must have jumped ship and hidden in our gravel
drive, but Murphy relented on this occasion. I defeated him on the air filter by discarding it
altogether.
Much of the other checking was straightforward. I like the idea of zero tappet clearance, even
though checking it ‘with the engine warm’ was not possible at that stage. (A bit like that impossible
instruction: “Never stop the engine when it’s hot.”) The plug had a 25 thou gap, which ought to
have been half that, there were a couple of loose nuts on the front fork caps (glad I found those!)
and the Lucas headlight switch only worked occasionally. Nothing to worry about. The mag points
were good, though a little lubrication was needed. The gearbox was empty of oil, so I put some more
in. But I couldn’t put off dealing with re-finishing the tank for much longer.
The inside of the tank did not, in fact, seem to be too bad. The rust flakes loosened by the swishing
had mostly gone, and I could not detect any bad patches or perforations. It did not justify a proper
sloshing, and there seem to be too many tales around of the sloshing compound coming loose for it
to be an attractive idea. I had, however, emptied a bottle of Kurust into the tank and sloshed that all
round, in the hope that it might inhibit the remaining rust should any more try to form. But the
outside? Well, what to do?
I had in mind re-finishing the tank myself, but I took it along to John Sole, one of our local bike and
car experts, to get a quote for him to do it. His take was that it should be re-finished in 2K paint
(that’s the nasty, isocyanate stuff) with a clear coat on top, since anything else might not be proof if
they carry on messing about with the petrol formula. He had a point. I have used 2K extensively in
the past, but to be safe, you have to have an air fed helmet, and preferably a spraybake oven to
control the atmosphere. I no longer had these facilities, and did not really fancy doing the job in
God’s own spray booth out in the fresh air. So we agreed that he would do the paint job from the
bare metal up to the base black coat, I would then take the tank back to mask up for the gold lining,
he would then have it back for the gold and the clearcoat finishing , and, no thanks, he was not going
to offer to do the gold lining by hand. It would be sprayed.
It turned out very well indeed. The tank is far better than the rest of the bike, but at least it means
that the only way for the rest of it is up. Perhaps the pie-crust petrol cap could be re-chromed next.
One day, when I get the time.
It had worried me for some time that I had not discovered any obvious reason why the previous
owner, having spent time and money on the rebuild, should have used the bike so little, and then
taken it off the road for the past eight years. Had he just run out of time or enthusiasm, or was
there some other reason why he had stopped using it? I was half expecting to find a big end gone,
or a lack of gears in the gear box, or whatever.
Page 5 of 6
What I did find, when I was giving it a clean prior to taking it out for the first time, was a bit of
copper wire. It was about 16 or 18 g., and it was wrapped round the rear axle between the hub and
the speedo drive, with the ends twisted together. WTF? Just then, the August Jampot magazine
showed up, and, would you believe it, there was a fix for a different model of bike, but explaining
that the retaining circlip on the rear axle had needed replacement because the groove had worn.
Might that be it? Should I start it up and take it out on the road, or should I take the rear wheel out
to get a better look at things? Still learning, as you see!
I could not believe that the previous owner really would have used a bit of copper wire instead of a
proper circlip. Surely he had not run out of cash to that extent? Or perhaps the circlip groove was a
bit worn, 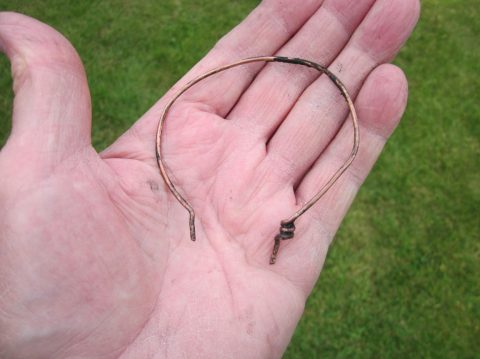
and the copper wire was to make sure the circlip stayed in place. I went back to the
Owners’ Manual, but there was little guidance, except that there seems to be both a circlip and also
an oil seal at that location, although the seal probably serves to keep dirt out rather than oil in.
Perhaps the wire was to secure the oil seal in place? Obviously, it was there for a purpose, and it
could not be ignored. There was nothing for it but to pull the wire off the rear axle and take a cold
hard look at it in the cold hard light of day.
I had half expected to get a shower of ball bearings falling out, or at least the circlip pieces rattling
on to the floor. But there was nothing. 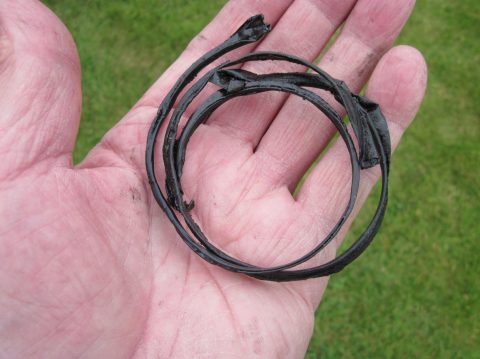
There was a long stringy piece of plastic wrapped round the
axle, and the wire was there to hold it in place. It could not have been a defunct oil seal, because
the plastic was long enough to go round the axle twice. It did not seem to be doing anything at all,
apart from filling the gap between the speedo cable drive and the round cover plate with a hole in it
which is part of the full width hub. Everything looked right and tight. If there was a problem, it was
not an obvious one, and it could wait until a test drive. Phew! I could get a good night’s sleep at last!
No I couldn’t, unfortunately. A further trawl round the Club’s forum that evening revealed a whole
lot more information than I had found previously, and including in particular a thread on speedo
gearboxes locking up. The photo there of a cutaway rear axle provided by ‘Biscuit’ was of
inestimable help, and allowed me to see exactly what I needed to know. It seemed the tape and the
wire must have been there for one of two purposes: Either to stop the lockring for the bearing from
coming unscrewed (a known problem) or to keep an oil seal in the speedo gearbox in position. The
circlip I had been worrying about was at the other end of the axle. This next bit has been re-written
three times now, but I hope this is the final definitive version. The photo of the cutaway axle
showed that the lockring was in the wrong place. It should be hard up against the hub, keeping the
cover plate in place and locking the bearing adjustment. But instead my lockring was up against the
speedo drive! The tape and the copper wire had been put there to keep the cover plate from
coming off. This, according to the Club forum, was just trouble waiting to happen. The back wheel
could lock up. So it was off with the rear wheel and take a further hard look at it to make sure the
rest of the wheel bearing had been put together in the right way. End (I hope) of problem.
Did I say that I found the gearbox had no oil in it? Guess why. The new lot of oil steadily found its
way out of the joint and on to the floor, despite my tightening down the cheesehead screws as much
as I decently could. Was it the paper gasket, or the kickstart seal? The cover had to come off,
anyway. All this extra fun, for no additional charge!
The manual gives the useful advice to tie up the kickstart before removing the cover, to stop it
rotating and unwinding the spring. What it did not say was to make sure the ball bearing on the end
of the clutch mechanism did not come out and disappear, or that certain parts which come away
with the cover can then fall off on to the floor the moment you turn the cover over. The seal on the
cover was intact, but traces of different coloured gasket sealing compounds (Hylomar, Hermatite,
and silicone rubber) gave testimony to the removal of this cover several times in the past. I added to
the rainbow effect by using my favourite, Wellseal. That should do it. I did not look to see whether
Page 6 of 6
there were oil seals on the kick start lever or the gear change because they would have been hard to
replace, the gear change lever in particular having been gorilla’d to the extent that it would never have come off
Back to the rear hub. I took the wheel out, and as I turned it over, the quickly detachable brake
drum quickly detached itself and fell on my foot. It obviously was trying to tell me something, so I
took the brake shoes off and cleaned everything up for a good look. The shoes were down to the
rivets. A quick order for an exchange pair revealed a different kind of problem. The shoes were not
the right ones for the bike, and in fact carried a BSA part number! Was I ever going to get this thing
sorted out and back on the road? The pegs which drive the QD brake drum were quite badly worn
too, and the holes in the drum were getting a bit egg-shaped as well, so the bike must have done
quite a mileage, even though the sprocket teeth were quite good. New pegs would eliminate much
of the wear, but the brake drum would have to wait for a full overhaul another day. I put a new
bearing in the QD hub, since the track was pitted.
The lockring, speedo gearbox, and the taper bearing adjuster which drives the speedo were all
rubbish. I replaced the lot, although the speedo gearbox was only available in the wrong hand, so it
had to be fitted the wrong way up. Not a problem, unless you are a rivet counter.
While the rear wheel was out and indoors, and while it was so cold in the stable, I thought it best to
re-finish the paintwork on the rim. The paint had to be chipped off, since the “new, double
strength” Nitromors wouldn’t touch it (or anything else I tried it on) but fortunately the paint did not
hold on too well to the chrome plate underneath. Would it be worthwhile masking off the whole of
the rest of the wheel, including each spoke nipple? Nope. The job got brushed!
All the foregoing was written more or less as it happened. There’s a lot more to come yet, but I
stopped writing it all down because I became more and more concerned with making it all work, and
sorting out the problems which appeared as soon as it did work, than with continuing with this
attempt on the Pulitzer Prize. So, take a breather, and when, by popular demand (signified by the
usual deafening silence) I take up the keyboard again, I will let you have the next bit of the saga.
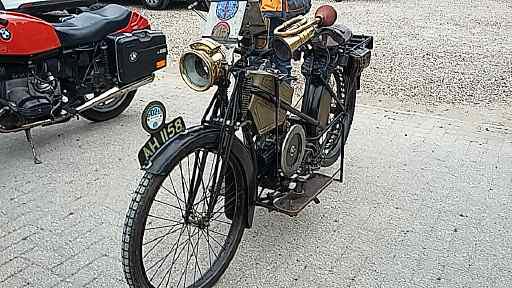
PHOTO MATERIAL:
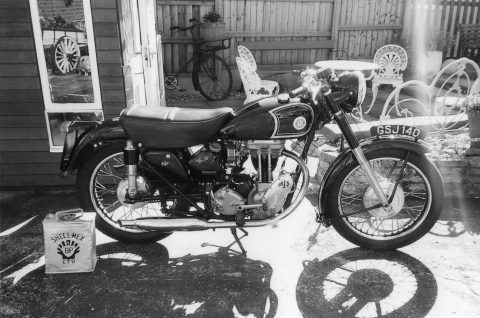
The bike as it was in 2004 – photo from the owner.
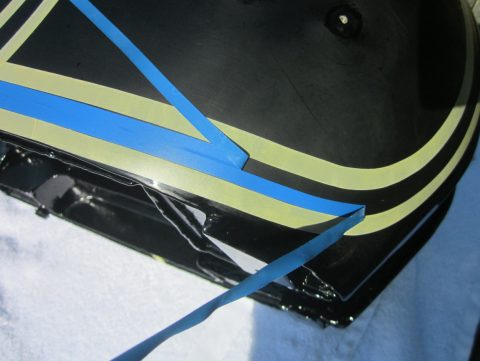
The other photos show (in sequence) the tank as originally finished, after stripping, and when the
masking was being applied for the gold lining. The trick here is to use two narrow strips of lining
tape side by side to establish the position and shape of the lining, this making it easier to move one
strip to make a better shape without losing the existing positioning altogether.
And finally, the finished tank. Not bad !
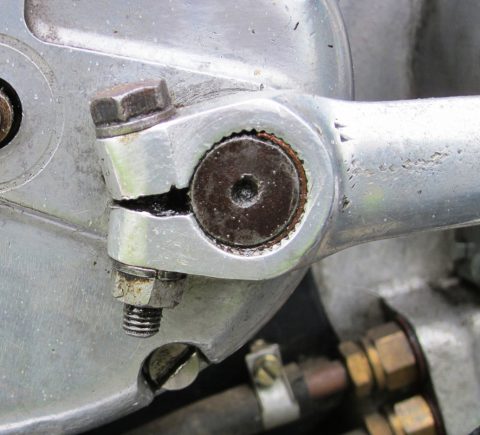
The worrisome copper wire and plastic strip wrapped round the back axle.
The Learning Curve (Autosaved).docx
Page 1 of 6